How can I contribute?#
The most obvious way to contribute is using the OpenBeagle (BeagleBoard.org GitLab server) to report bugs, suggest enhancements and providing merge requests / pull requests to fix software, hardware designs and documentation. We have made it easy to share the link while you are working with documentation and provide feedback for any heading, figure, and table.
button is to copy the link of current heading, figure, or table.
button is to open feedback modal for submitting issue, feedback, and idea.

Fig. 14 Copy link and feedback button#
When you click on button, you will see the modal as shown in the image below. With this you can easily provide us ideas, feedback, and create issues directly on OpenBeagle from docs site.
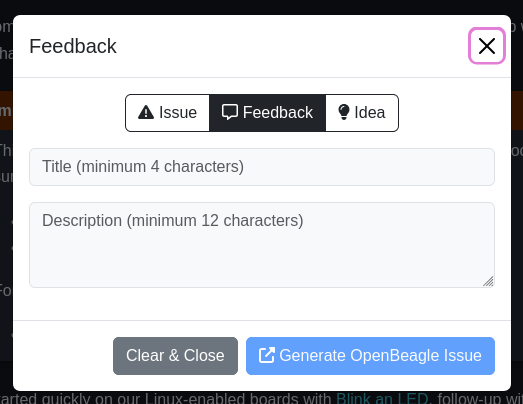
Fig. 15 Feedback modal#
Note
You need an active OpenBeagle account to use the feedback modal.
Tip
Reading the help guide is a great way to get started using OpenBeagle.
Suggesting enhancements#
An issue doesn’t have to be something wrong, it can just be about making something better. If in doubt how to make a productive suggestion, hop on the forum and live chat groups to see what other people say. Check the current ideas that are already out there and give us your idea. Try to be constructive in your suggestion. We are a primarily a volunteer community looking to make your experience better, as those that follow you, and your suggestion could be key in that endeavor.
Where available, use the “enhancement” label on your issue to make sure we know you are looking for a future improvement, not reporting something critically wrong.
Submitting merge requests#
If you want to contribute to a project, the most practical way is with a merge request. Start by creating a fork, which is your own copy of the project you can feel free to edit how you see fit. When ready, create a merge request and we’ll review your work and give comments back to you. If suitable, we’ll update the code to include your contribution!
A bit more detailed suggestions can be found in the articles linked below.
Site Editing Guide#
Docs site uses OpenBeagle Continous Integration (CI) / Continous Development (CD) which is a continuous method of software development, where you continuously build, test, deploy, and monitor iterative code changes. which means you don’t have to setup anything on your local machine to update anything on the site. To contribute to this site, you can follow the simple steps provided below.
Note
OpenBeagle is a self hosted instance of open source program called GitLab.
Tip
If you want to build on your local machine we have added venv-build-env.sh and requirements.txt
to help you setup sphinx and all the other dependencies. Execute these commands in your terminal,
Install python modules and setup virtual environment,
. ./venv-build-env.sh
Build and serve it live using sphinx-autobuild,
make livehtml
Now, you can open http://127.0.0.1:8000 on any browser to see the rendered HTML with live updates. Clear cookies and site data in your browser window to view up-to-date site.
Fork the project#
Go to docs.beagleboard.io repo on OpenBeagle and click on fork button create a fork on your personal OpenBeagle profile.

Fig. 16 Fork button#
After clicking on the fork button, you’ll be taken to a page like shown below where you have to,
Select your profile from the dropdown.
Click on fork project button to initiate the forking process.
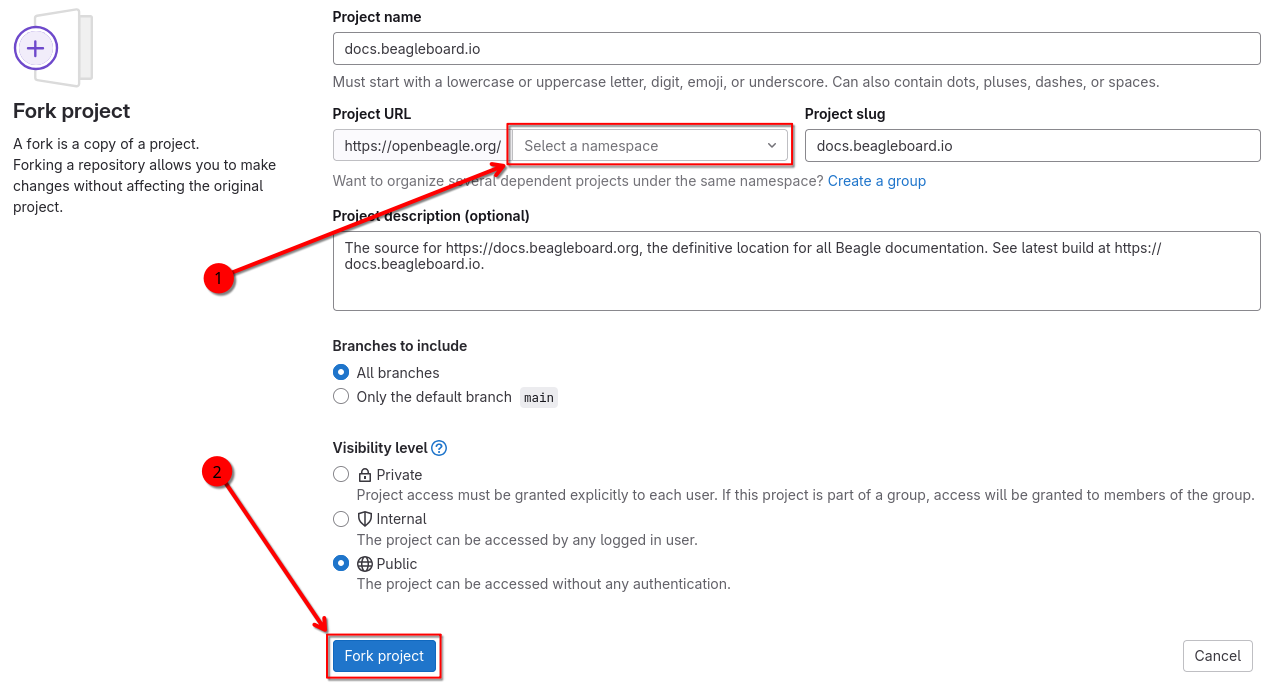
Fig. 17 Fork project#
Select file to edit#
After successfully forking the project you have to,
Make sure you are on the forked repo on your profile, it should be
https://openbeagle.org/<user-name>/docs.beagleboard.iowhere <user-name> should be replaced with your OpenBeagle username.Select any file you want to edit from the files & folders view of the repo page.
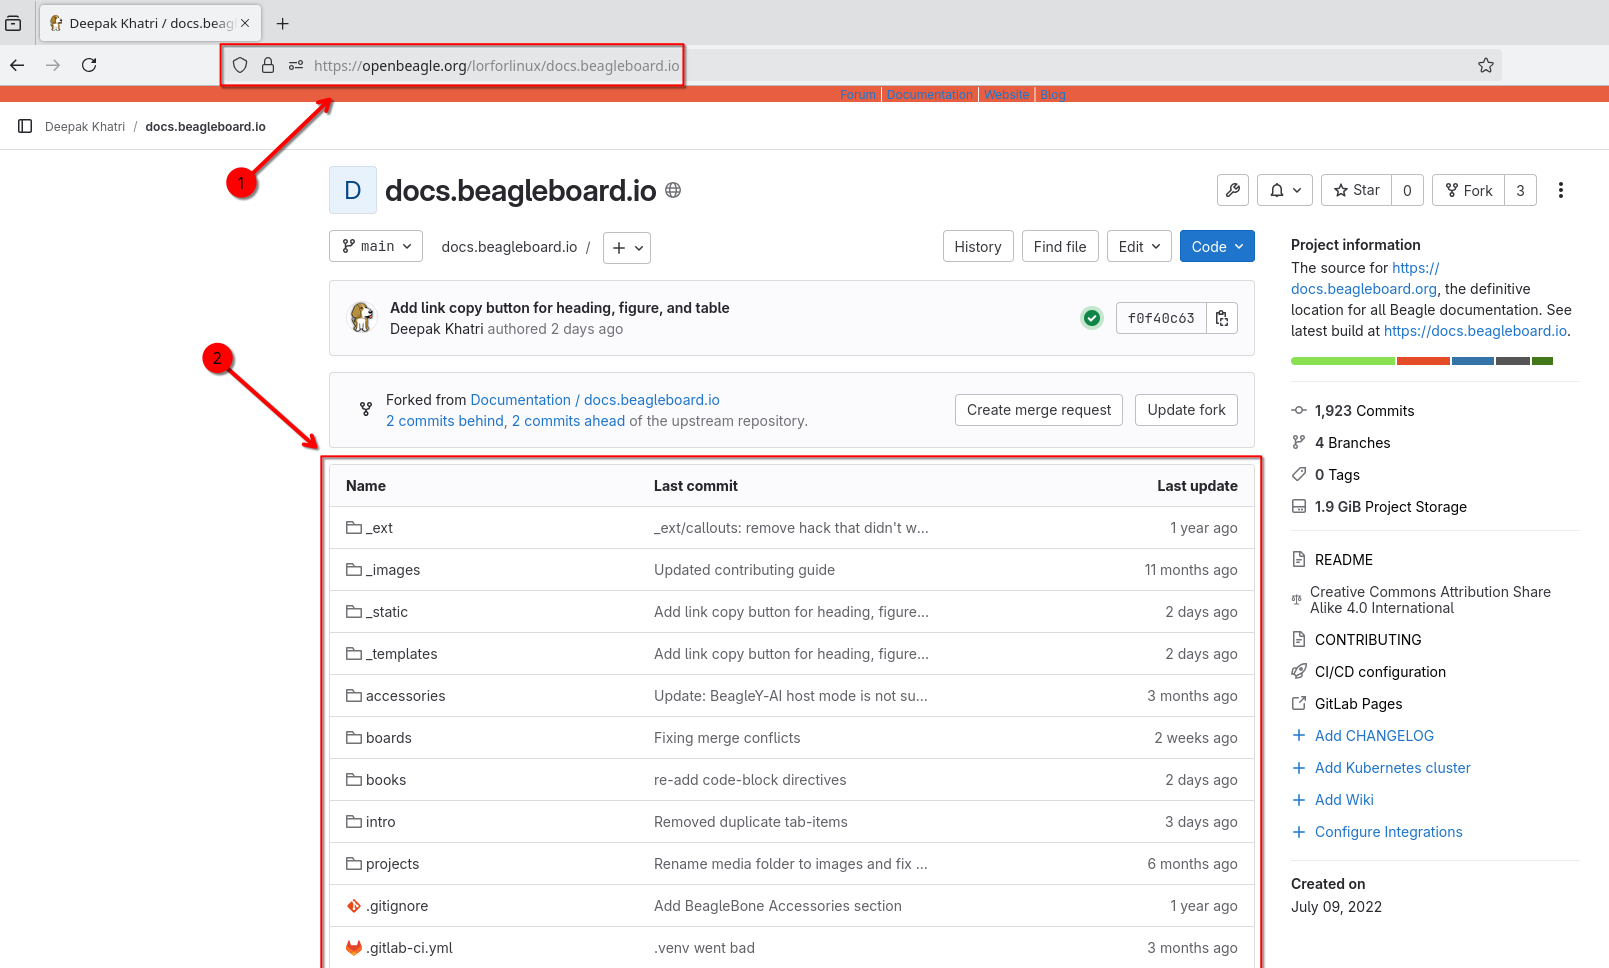
Fig. 18 Repository files and folders#
After selecting the file you have to click on edit button and then choose either of the options from drop-down,
Open in Web IDE, choose this if you want to work on multiple files.Edit single file, choose this if you want to make some small edits in a single file.

Fig. 19 Edit button#
Note
Choosing Web IDE will load a Visual Studio Code Server
instance which is a feature rich source code editor. Depending on the internent connection, your machine will take some time to
load the editor and it can be a bit heavy for some machines to handle. Once fully loaded it should run smoothly but, if that is
not the case then please consider using single file editor option. Considering majority of the users will be using Web IDE option,
we are using the Web IDE for the rest of this guide.
Start editing#
If you select to open your file in Web IDE you’ll see a familar interface. The GitLab Web IDE is actually a rich
Visual Studio Code Server hosted on OpenBeagle.

Fig. 20 Wed IDE#
Tip
We use reStructuredText (RST) for all of our documentation projects including GSoC site and documentation site. If you are new to reStructuredText you can checkout our reStructuredText cheatsheet to get yourself familiar with reStructuredText.
Why not use Markdown for documentation?
Because reStructuredText stands out against Markdown as,
It’s more fully-featured.
It’s much more standardized and uniform.
It has built-in support for extensions.
For more detailed comparison you can checkout this article on reStructuredText vs. Markdown for technical documentation
Now you have to select a file and start editing. Below image shows some,
Edits made to the
conf.pyfile, changes are highlighted with green bar on left side of code editor window near line numbers.Source control button indicating (1) file updated in the repo.
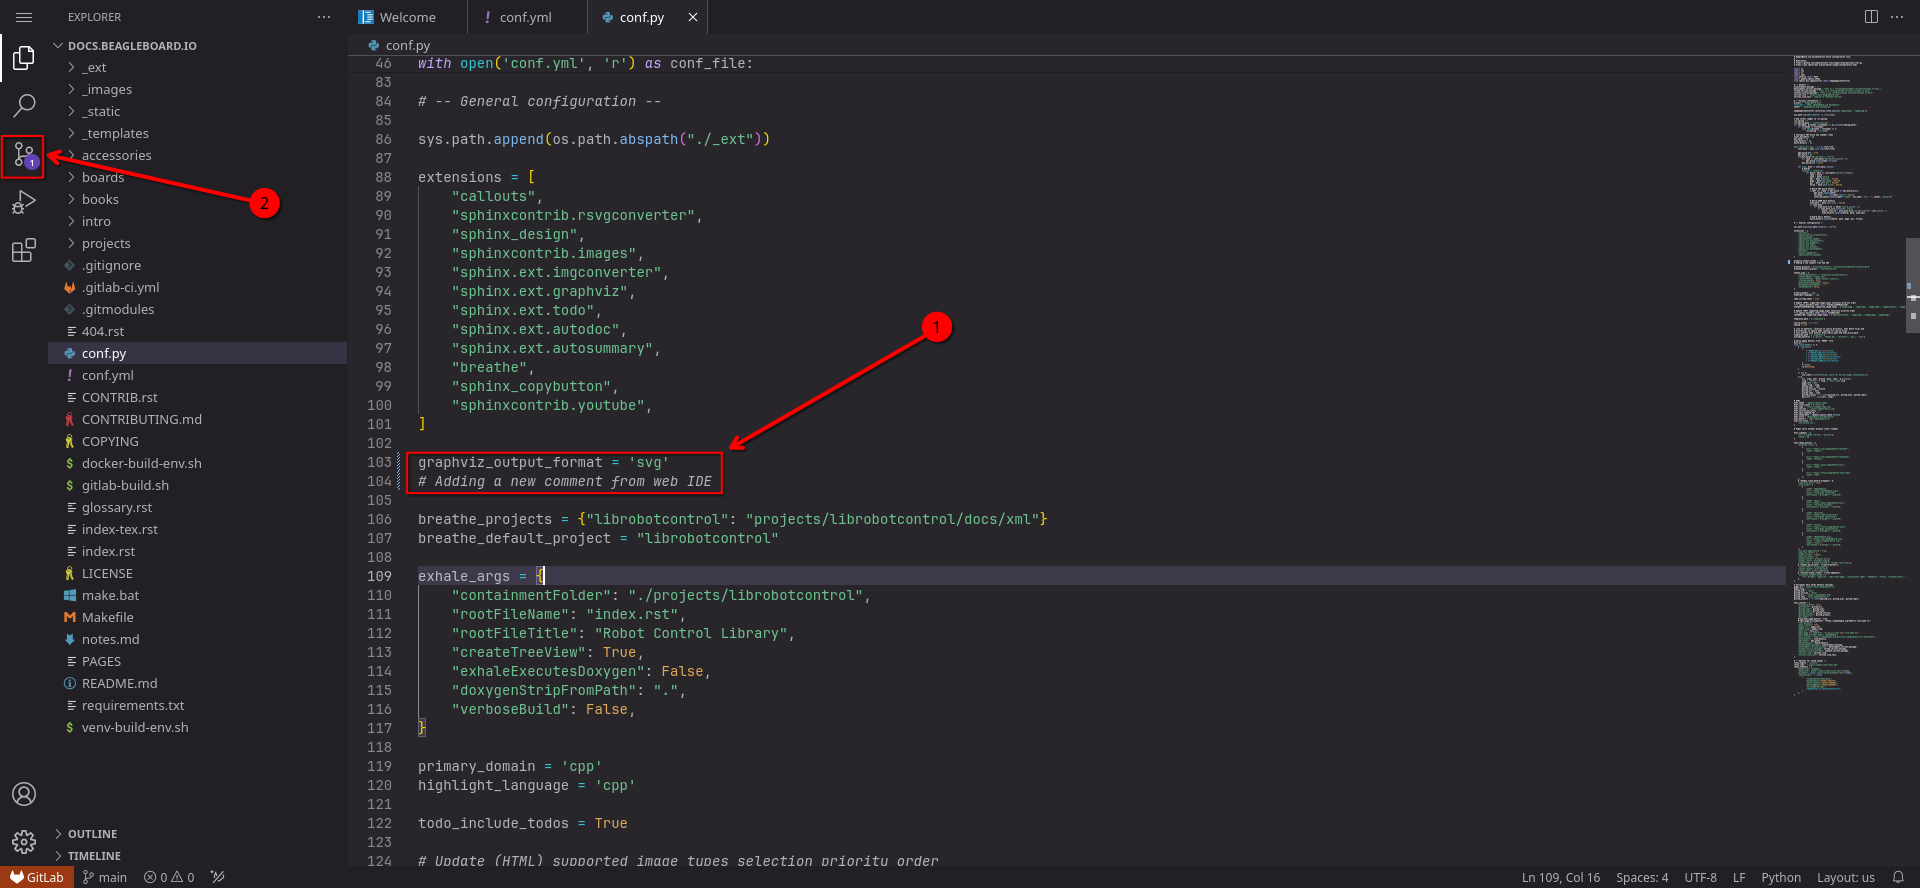
Fig. 21 Make edits#
Tip
Just like you do on your normal Visual Studio Code desktop application, to commit your changes you can either
click on Source control ( ) button or press CTRL + SHIFT + G to see all the edited files.
After switching to source control you have to,
Add a commit message in the input field then commit your changes.
Click on
Commit to mainbutton (not recommended).Click on drop down button to choose
Commit to new branch(recommended).
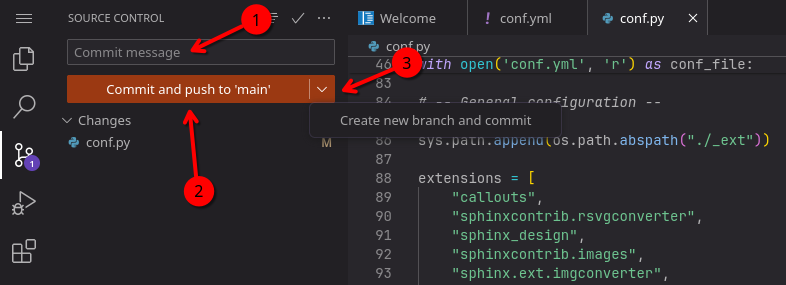
Fig. 22 Commit changes#
After clicking Commit to 'main' button you’ll be prompted with a window (shown below) with three options,
Create new branchCancelContinue
Click on Continue button if you want to commit to main (default branch) if it’s a single edit or commit.
Click on Create new branch if you want to create a new branch and want to keep your main branch clean. Advantage
of creating a new branch is that assigned reviewer for a pull request / merge request can also add commits to your
newly created branch which is not possible for your main branch because it’s a protected branch by default.

Fig. 23 Commit branch#
When all done right, at the lower right side of the Web IDE you’ll see a prompt showing
Success! Your changes have been committed message with two buttons,
Go to ProjectContinue working

Fig. 24 Commit success#
If you click on Go to Project button, you’ll see,
1. The commit successfully applied and the green tick shown on the right side indicates that the CI build was also successful.
2. Option to create a merge request and update your fork.

Fig. 25 Commit#
Congratulations!!
You have made a valuable contribution to an OpenBeagle project!
Create a merge request#
After making your changes and commiting them to your forked repo, you are set to create a new pull request / merge request so that those changes can be merged to upstream repo. To start your new PR, click on the dedicated button to create a new merge request and fill out all the details. The image below shows all the fields you have to update,
Provide a good title that reflects your work.
Add a detailed description of the work you have done. Add pictures whenever seems useful.
(Optional) you can assign it to yourself if you’ll be working on further updates or assign it to someone else who might want to work on the comments we may provide on your work.
Add
lorforlinuxas reviewer for PRs with site content update or add your mentor as reviewer if it’s related to project work / proposal.If you want your commits to be shown as a single commit, then you can choose the
sqash commits ...check box.Check if all your commits are shown in the bottom of the screen and if everything looks okay, then click on
Create merge requestbutton.
Tip
If you are still working on some updates, you may also choose Mark as draft checkbox (below title)
which indicates that you are seeking feedback before making your commits suitable to merge.
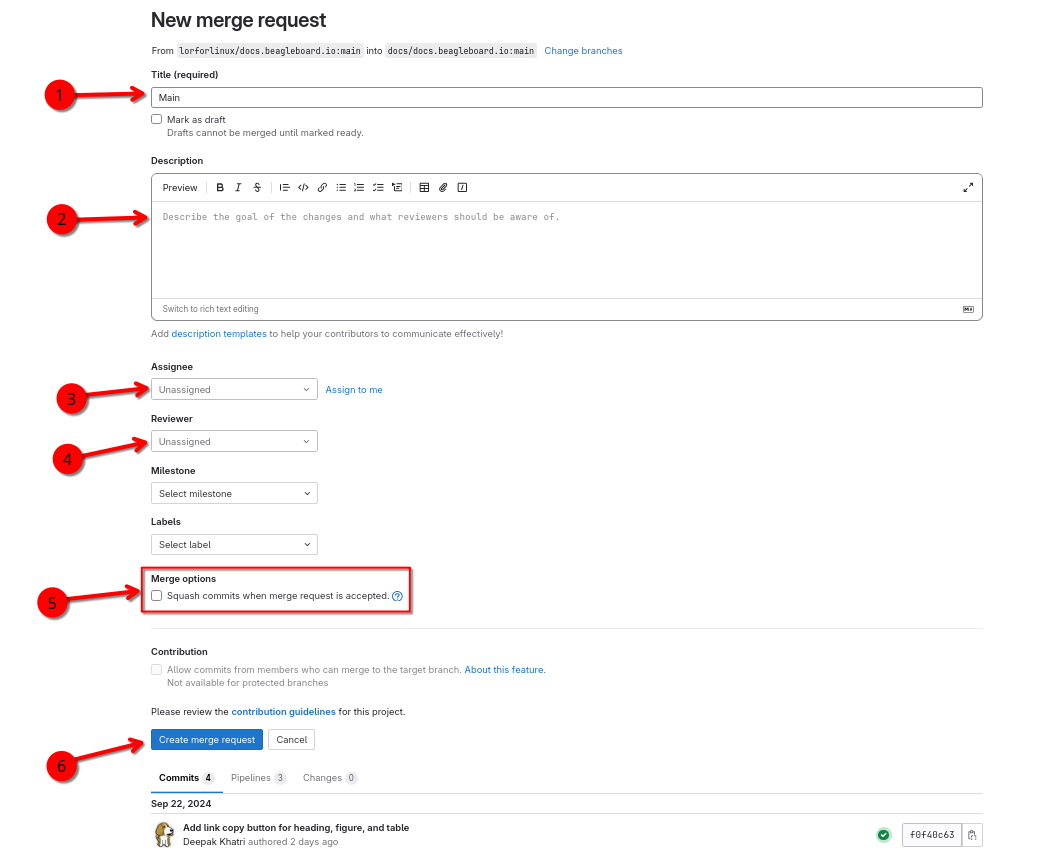
Fig. 26 Merge request#
Now wait for a review and, if comments are raised, then you can continue working on the project until everything looks perfect and your changes are merged in upstream.
Google Summer of Code (GSoC)#
For newcomers venturing into the realm of open-source contribution, Google Summer of Code (GSoC) stands as an invaluable platform. GSoC provides a unique opportunity to collaborate with the open-source community, engaging in the identification and development of exciting projects during the summer term.
BeagleBoard.org serves as a mentorship organization that takes part in the Google Summer of Code program actively, giving students the opportunity to work on open-source projects during the summer. Visit our dedicated Google Summer of Code (GSoC) for more information about this program, including past projects and mentorship opportunities.
Reporting bugs#
Start by reading the OpenBeagle Issues help page.
Please request an account and report any issues on the appropriate project issue tracker at https://openbeagle.org.
Report issues on the software images at https://openbeagle.org/explore/topics/distros.
Report issues on the hardware at https://openbeagle.org/explore/projects/topics/boards.
Tackle to-do list#
This documentation has a number of todo items where help is needed that can be searched in the source. This list will
show up directly in the staging documentation at https://docs.beagleboard.io/latest/intro/contribution/how.html#contribution-todo-list
Todo
add cape compatibility details
(The original entry is located in /builds/melta101/docs.beagleboard.io/boards/beaglebone/ai-64/01-introduction.rst, line 75.)
Todo
Variable & MAC Memory
VSYS_IO_3V3
(The original entry is located in /builds/melta101/docs.beagleboard.io/boards/beaglebone/ai-64/04-expansion.rst, line 1666.)
Todo
Clean/Update table
(The original entry is located in /builds/melta101/docs.beagleboard.io/boards/beaglebone/ai-64/04-expansion.rst, line 1691.)
Todo
Align with other boards and migrate away from pin usage entries for BeagleBone Black expansion
(The original entry is located in /builds/melta101/docs.beagleboard.io/boards/beaglebone/ai-64/04-expansion.rst, line 1761.)
Todo
Add BeagleBone AI-64 cape mechanical characteristics**
(The original entry is located in /builds/melta101/docs.beagleboard.io/boards/beaglebone/ai-64/04-expansion.rst, line 2131.)
Todo
Update everything taken from BBB chapters to BB AI-64 compatible text.
(The original entry is located in /builds/melta101/docs.beagleboard.io/boards/beaglebone/ai-64/04-expansion.rst, line 2172.)
Todo
IMX219 CSI sensor connection with BeagleBone® AI-64 for Edge AI
(The original entry is located in /builds/melta101/docs.beagleboard.io/boards/beaglebone/ai-64/edge_ai_apps/getting_started.rst, line 78.)
Todo
BeagleBone® AI-64 wallpaper upon boot
(The original entry is located in /builds/melta101/docs.beagleboard.io/boards/beaglebone/ai-64/edge_ai_apps/getting_started.rst, line 182.)
Todo
Microsoft Visual Studio Code for connecting to BeagleBone® AI-64 for Edge AI via SSH
(The original entry is located in /builds/melta101/docs.beagleboard.io/boards/beaglebone/ai-64/edge_ai_apps/getting_started.rst, line 243.)
Todo
Update to latest text from Texas Instruments Edge AI docs
(The original entry is located in /builds/melta101/docs.beagleboard.io/boards/beaglebone/ai-64/edge_ai_apps/index.rst, line 6.)
Todo
Need info on BBAI boot mode settings
(The original entry is located in /builds/melta101/docs.beagleboard.io/boards/beaglebone/ai/03-design-and-specifications.rst, line 266.)
Todo
Need info on BBAI power management
(The original entry is located in /builds/melta101/docs.beagleboard.io/boards/beaglebone/ai/03-design-and-specifications.rst, line 271.)
Todo
Add WiFi/Bluetooth/Ethernet
(The original entry is located in /builds/melta101/docs.beagleboard.io/boards/beaglebone/ai/03-design-and-specifications.rst, line 276.)
Todo
This text needs to go somewhere.
(The original entry is located in /builds/melta101/docs.beagleboard.io/boards/beaglebone/ai/03-design-and-specifications.rst, line 283.)
Todo
(Schematic screenshot)
(The original entry is located in /builds/melta101/docs.beagleboard.io/boards/beaglebone/ai/03-design-and-specifications.rst, line 373.)
Todo
Verify it isn’t better than this. Doesn’t seem right.
(The original entry is located in /builds/melta101/docs.beagleboard.io/boards/beaglebone/ai/03-design-and-specifications.rst, line 504.)
Todo
Notes regarding the resistors on muxed pins.
(The original entry is located in /builds/melta101/docs.beagleboard.io/boards/beaglebone/ai/04-expansion.rst, line 922.)
Todo
(Actually, on BeagleBone AI, I believe PWR_BUT is pulled to 3.3V, but activation is still done by pulling the signal to GND. Also, a quick grounding of PWR_BUT will trigger a system event where shutdown can occur, but there is no hardware power-off function like on BeagleBone Black via this signal. It does, however, act as a hardware power-on.)
(The original entry is located in /builds/melta101/docs.beagleboard.io/boards/beaglebone/ai/04-expansion.rst, line 964.)
Todo
(On BeagleBone Black, SYS_RESET was a bi-directional signal, but it is only an output from BeagleBone AI to capes on BeagleBone AI.)
(The original entry is located in /builds/melta101/docs.beagleboard.io/boards/beaglebone/ai/04-expansion.rst, line 970.)
Todo
This table needs entries
(The original entry is located in /builds/melta101/docs.beagleboard.io/boards/beaglebone/ai/04-expansion.rst, line 1484.)
Todo
Table entries needed
(The original entry is located in /builds/melta101/docs.beagleboard.io/boards/beaglebone/ai/04-expansion.rst, line 1576.)
Todo
Need info on BealgeBone AI serial debug
(The original entry is located in /builds/melta101/docs.beagleboard.io/boards/beaglebone/ai/04-expansion.rst, line 1590.)
Todo
Need info on BealgeBone AI USB Type-C connection
(The original entry is located in /builds/melta101/docs.beagleboard.io/boards/beaglebone/ai/04-expansion.rst, line 1595.)
Todo
Need info on BealgeBone AI USB Type-A connection
(The original entry is located in /builds/melta101/docs.beagleboard.io/boards/beaglebone/ai/04-expansion.rst, line 1600.)
Todo
Need info on BealgeBone AI USB Gigabit Ethernet connection
(The original entry is located in /builds/melta101/docs.beagleboard.io/boards/beaglebone/ai/04-expansion.rst, line 1605.)
Todo
Need info on BealgeBone AI u.FL antenna connection
(The original entry is located in /builds/melta101/docs.beagleboard.io/boards/beaglebone/ai/04-expansion.rst, line 1610.)
Todo
Need info on BealgeBone AI uSD card slot
(The original entry is located in /builds/melta101/docs.beagleboard.io/boards/beaglebone/ai/04-expansion.rst, line 1615.)
Todo
Need info on BealgeBone AI uHDMI connection
(The original entry is located in /builds/melta101/docs.beagleboard.io/boards/beaglebone/ai/04-expansion.rst, line 1620.)
Todo
Add BeagleBone-AI content
(The original entry is located in /builds/melta101/docs.beagleboard.io/boards/beaglebone/ai/04-expansion.rst, line 1633.)
Todo
Add BeagleBone-AI BeagleBone® Black Cape Compatibility section content
(The original entry is located in /builds/melta101/docs.beagleboard.io/boards/beaglebone/ai/04-expansion.rst, line 1638.)
Todo
Add BeagleBone-AI EEPROM section content
(The original entry is located in /builds/melta101/docs.beagleboard.io/boards/beaglebone/ai/04-expansion.rst, line 1645.)
Todo
Add BeagleBone-AI Pin Usage Consideration section content
(The original entry is located in /builds/melta101/docs.beagleboard.io/boards/beaglebone/ai/04-expansion.rst, line 1650.)
Todo
Add BeagleBone-AI GPIO section content
(The original entry is located in /builds/melta101/docs.beagleboard.io/boards/beaglebone/ai/04-expansion.rst, line 1655.)
Todo
Add BeagleBone-AI I2C section content
(The original entry is located in /builds/melta101/docs.beagleboard.io/boards/beaglebone/ai/04-expansion.rst, line 1660.)
Todo
Add BeagleBone-AI content
(The original entry is located in /builds/melta101/docs.beagleboard.io/boards/beaglebone/ai/04-expansion.rst, line 1733.)
Todo
Add BeagleBone-AI SPI section content
(The original entry is located in /builds/melta101/docs.beagleboard.io/boards/beaglebone/ai/04-expansion.rst, line 1738.)
Todo
Add BeagleBone-AI Analog section content
(The original entry is located in /builds/melta101/docs.beagleboard.io/boards/beaglebone/ai/04-expansion.rst, line 1743.)
Todo
Add BeagleBone-AI PWM, TIMER, eCAP or PRU PWM/eCAP section content
(The original entry is located in /builds/melta101/docs.beagleboard.io/boards/beaglebone/ai/04-expansion.rst, line 1750.)
Todo
Add BeagleBone-AI eQEP section content
(The original entry is located in /builds/melta101/docs.beagleboard.io/boards/beaglebone/ai/04-expansion.rst, line 1755.)
Todo
Add BeagleBone-AI CAN section content
(The original entry is located in /builds/melta101/docs.beagleboard.io/boards/beaglebone/ai/04-expansion.rst, line 1760.)
Todo
Add BeagleBone-AI McASP (audio serial like I2S and AC97) section content
(The original entry is located in /builds/melta101/docs.beagleboard.io/boards/beaglebone/ai/04-expansion.rst, line 1767.)
Todo
Add BeagleBone-AI MMC section content
(The original entry is located in /builds/melta101/docs.beagleboard.io/boards/beaglebone/ai/04-expansion.rst, line 1772.)
Todo
Add BeagleBone-AI LCD section content
(The original entry is located in /builds/melta101/docs.beagleboard.io/boards/beaglebone/ai/04-expansion.rst, line 1777.)
Todo
Add BeagleBone-AI PRU GPIO section content
(The original entry is located in /builds/melta101/docs.beagleboard.io/boards/beaglebone/ai/04-expansion.rst, line 1782.)
Todo
Add BeagleBone-AI CLKOUT section content
(The original entry is located in /builds/melta101/docs.beagleboard.io/boards/beaglebone/ai/04-expansion.rst, line 1787.)
Todo
discuss header options for working with the expansion connectors per https://git.beagleboard.org/beagleboard/beaglebone-black/-/wikis/System-Reference-Manual#section-7-1
(The original entry is located in /builds/melta101/docs.beagleboard.io/boards/beaglebone/ai/04-expansion.rst, line 1792.)
Todo
Add BeagleBone-AI Signal Usage section content
(The original entry is located in /builds/melta101/docs.beagleboard.io/boards/beaglebone/ai/04-expansion.rst, line 1798.)
Todo
Add BeagleBone-AI Cape Power section content
(The original entry is located in /builds/melta101/docs.beagleboard.io/boards/beaglebone/ai/04-expansion.rst, line 1803.)
Todo
Add BeagleBone-AI Mechanical section content
(The original entry is located in /builds/melta101/docs.beagleboard.io/boards/beaglebone/ai/04-expansion.rst, line 1808.)
Todo
Reference https://docs.beagleboard.org/latest/intro/support/index.html and https://beagleboard.org/resources
Related TI documentation: http://www.ti.com/tool/BEAGLE-3P-BBONE-AI
(The original entry is located in /builds/melta101/docs.beagleboard.io/boards/beaglebone/ai/06-support.rst, line 9.)
Todo
Add production boot media link in _static/epilog/production.image and reference it here.
(The original entry is located in /builds/melta101/docs.beagleboard.io/boards/beaglebone/ai/06-support.rst, line 19.)
Todo
Make all figure references actual references
(The original entry is located in /builds/melta101/docs.beagleboard.io/boards/beaglebone/black/ch07.rst, line 1163.)
Todo
move accessory links to a single common document for all boards.
(The original entry is located in /builds/melta101/docs.beagleboard.io/boards/beaglebone/black/ch07.rst, line 1184.)
Todo
We should include all support information in docs.beagleboard.org now and leave eLinux to others, freeing it as much as possible
(The original entry is located in /builds/melta101/docs.beagleboard.io/boards/beaglebone/black/ch07.rst, line 1194.)
Todo
We are going to work on a unified accessories page for all the boards and it should replace this.
(The original entry is located in /builds/melta101/docs.beagleboard.io/boards/beaglebone/blue/accessories.rst, line 6.)
Todo
Add production boot media link in _static/epilog/production.image and reference it here.
(The original entry is located in /builds/melta101/docs.beagleboard.io/boards/beaglebone/blue/faq.rst, line 13.)
Todo
Image with what’s inside the box and a better description.
(The original entry is located in /builds/melta101/docs.beagleboard.io/boards/beagleconnect/freedom/02-quick-start.rst, line 14.)
Todo
Describe how to get a serial connection.
(The original entry is located in /builds/melta101/docs.beagleboard.io/boards/beagleconnect/freedom/02-quick-start.rst, line 41.)
Todo
Describe how to get an IEEE802.15.4g connection from BeaglePlay.
(The original entry is located in /builds/melta101/docs.beagleboard.io/boards/beagleconnect/freedom/02-quick-start.rst, line 48.)
Todo
Describe how to get to a local console and websockets console.
(The original entry is located in /builds/melta101/docs.beagleboard.io/boards/beagleconnect/freedom/02-quick-start.rst, line 59.)
Todo
Add BeagleConnect Freedom expansion chapter content.
(The original entry is located in /builds/melta101/docs.beagleboard.io/boards/beagleconnect/freedom/04-expansion.rst, line 6.)
Todo
Find a place for the following notes:
(The original entry is located in /builds/melta101/docs.beagleboard.io/boards/beagleconnect/freedom/demos-and-tutorials/using-greybus.rst, line 116.)
Todo
Need to describe functionality of 0.2.2
(The original entry is located in /builds/melta101/docs.beagleboard.io/boards/beagleconnect/freedom/demos-and-tutorials/using-micropython.rst, line 201.)
Todo
note the tested version of software for BeaglePlay
(The original entry is located in /builds/melta101/docs.beagleboard.io/boards/beagleconnect/freedom/demos-and-tutorials/using-zephyr.rst, line 41.)
Todo
Add documentation to debug BCF zephyr application over serial terminal.
(The original entry is located in /builds/melta101/docs.beagleboard.io/boards/beagleconnect/freedom/demos-and-tutorials/using-zephyr.rst, line 151.)
Todo
provide images demonstrating Jupyter Notebook visualization
(The original entry is located in /builds/melta101/docs.beagleboard.io/boards/beagleconnect/index.rst, line 64.)
Todo
provide image illustrating remote management
(The original entry is located in /builds/melta101/docs.beagleboard.io/boards/beagleconnect/index.rst, line 75.)
Todo
think a bit more about this section with some feedback from Cathy.
(The original entry is located in /builds/melta101/docs.beagleboard.io/boards/beagleconnect/index.rst, line 83.)
Todo
Add specific power-up/down sequence notes here as well a highlight any limitations and known issues.
(The original entry is located in /builds/melta101/docs.beagleboard.io/boards/beagleplay/03-design.rst, line 144.)
Todo
Add information on building expansion hardware for BeaglePlay.
(The original entry is located in /builds/melta101/docs.beagleboard.io/boards/beagleplay/04-expansion.rst, line 6.)
Todo
Add notes on changing SSID/Password
(The original entry is located in /builds/melta101/docs.beagleboard.io/boards/beagleplay/demos-and-tutorials/connect-wifi.rst, line 344.)
Todo
Add the below changes to the beagle defconfig
(The original entry is located in /builds/melta101/docs.beagleboard.io/boards/beagleplay/demos-and-tutorials/low-power-video-doorbell.rst, line 99.)
Todo
To make it stick, …
(The original entry is located in /builds/melta101/docs.beagleboard.io/boards/beagleplay/demos-and-tutorials/using-mikrobus.rst, line 168.)
Todo
Document kernel version that integrates this overlay and where to get update instructions.
(The original entry is located in /builds/melta101/docs.beagleboard.io/boards/beagleplay/demos-and-tutorials/using-mikrobus.rst, line 422.)
Todo
How do turn off the driver?
How do turn on spidev?
How do I enable GPIO?
How do a provide a manifest?
(The original entry is located in /builds/melta101/docs.beagleboard.io/boards/beagleplay/demos-and-tutorials/using-mikrobus.rst, line 467.)
Todo
Needs udev
Needs live description
(The original entry is located in /builds/melta101/docs.beagleboard.io/boards/beagleplay/demos-and-tutorials/using-mikrobus.rst, line 475.)
Todo
Add flow diagram
Show the output
(The original entry is located in /builds/melta101/docs.beagleboard.io/boards/beagleplay/demos-and-tutorials/using-nodered.rst, line 107.)
Todo
Describe how to know it is working
(The original entry is located in /builds/melta101/docs.beagleboard.io/boards/beagleplay/demos-and-tutorials/zephyr-cc1352-development.rst, line 56.)
Todo
A big part of what is missing here is to put your BeaglePlay on the Internet such that we can download things in later steps. That has been initially brushed over.
(The original entry is located in /builds/melta101/docs.beagleboard.io/boards/beagleplay/demos-and-tutorials/zephyr-cc1352-development.rst, line 67.)
Todo
west build -d build/sensortest zephyr/samples/boards/beagle_bcf/sensortest -- -DOVERLAY_CONFIG=overlay-subghz.conf
west build -d build/wpanusb modules/lib/wpanusb_bc -- -DOVERLAY_CONFIG=overlay-subghz.conf
west build -d build/bcfserial modules/lib/wpanusb_bc -- -DOVERLAY_CONFIG=overlay-bcfserial.conf -DDTC_OVERLAY_FILE=bcfserial.overlay
west build -d build/greybus modules/lib/greybus/samples/subsys/greybus/net -- -DOVERLAY_CONFIG=overlay-802154-subg.conf
(The original entry is located in /builds/melta101/docs.beagleboard.io/boards/beagleplay/demos-and-tutorials/zephyr-cc1352-development.rst, line 351.)
Todo
Describe how to handle the serial connection
(The original entry is located in /builds/melta101/docs.beagleboard.io/boards/beagleplay/demos-and-tutorials/zephyr-cc1352-development.rst, line 391.)
Todo
remove “<To-Do>” items in the table below.
(The original entry is located in /builds/melta101/docs.beagleboard.io/boards/beaglev/ahead/01-introduction.rst, line 55.)
Todo
add instructions for flashing in windows.
(The original entry is located in /builds/melta101/docs.beagleboard.io/boards/beaglev/ahead/02-quick-start.rst, line 197.)
Todo
add instructions for flashing in Mac.
(The original entry is located in /builds/melta101/docs.beagleboard.io/boards/beaglev/ahead/02-quick-start.rst, line 201.)
Todo
We need a CSI capture and DSI display demos
(The original entry is located in /builds/melta101/docs.beagleboard.io/boards/beaglev/ahead/05-demos.rst, line 7.)
Todo
We need a cape compatibility layer demo
(The original entry is located in /builds/melta101/docs.beagleboard.io/boards/beaglev/ahead/05-demos.rst, line 11.)
Todo
update details
(The original entry is located in /builds/melta101/docs.beagleboard.io/boards/beaglev/ahead/06-support.rst, line 22.)
Todo
update details
(The original entry is located in /builds/melta101/docs.beagleboard.io/boards/beaglev/ahead/06-support.rst, line 31.)
Todo
add image & information about box content.
(The original entry is located in /builds/melta101/docs.beagleboard.io/boards/beaglev/fire/02-quick-start.rst, line 14.)
Todo
Add information for custom hardware building and debugging.
(The original entry is located in /builds/melta101/docs.beagleboard.io/boards/beaglev/fire/04-expansion.rst, line 9.)
Todo
We need a CSI capture demos
(The original entry is located in /builds/melta101/docs.beagleboard.io/boards/beaglev/fire/05-demos.rst, line 6.)
Todo
We need a cape compatibility layer demo
(The original entry is located in /builds/melta101/docs.beagleboard.io/boards/beaglev/fire/05-demos.rst, line 10.)
Todo
Add production boot media link in _static/epilog/production.image and reference it here.
(The original entry is located in /builds/melta101/docs.beagleboard.io/boards/beaglev/fire/06-support.rst, line 12.)
Todo
update details
(The original entry is located in /builds/melta101/docs.beagleboard.io/boards/beaglev/fire/06-support.rst, line 22.)
Todo
update details
(The original entry is located in /builds/melta101/docs.beagleboard.io/boards/beaglev/fire/06-support.rst, line 31.)
Todo
This is the hard way! Special cables and FlashPros are not required when using the firmware we initially ship on the board. This tutorial should be rescripted as how to _unbrick_ your board. Also, we have other work-arounds using software and GPIOs rather than FlashPros. Let’s not put this in user’s face as the experience when it is far more painful than using the change-gateware.sh script and “hold BOOT button when applying power” solutions we’ve created!
(The original entry is located in /builds/melta101/docs.beagleboard.io/boards/beaglev/fire/demos-and-tutorials/flashing-board.rst, line 6.)
Todo
Due to the current Linux kernel being on 6.1, only a UIO driver is available instead of a Socket CAN driver. This section will be updated once Linux kernel 6.6 is shipped for the beagleV-fire, with the Socket CAN driver.
(The original entry is located in /builds/melta101/docs.beagleboard.io/boards/beaglev/fire/demos-and-tutorials/gateware/comms-cape-gateware-usage.rst, line 30.)
Todo
Make sure people know about the alternative and we provide links to details on that before we send them down this process.
(The original entry is located in /builds/melta101/docs.beagleboard.io/boards/beaglev/fire/demos-and-tutorials/mchp-fpga-tools-installation-guide.rst, line 13.)
Todo
BeagleY-AI unboxing video
(The original entry is located in /builds/melta101/docs.beagleboard.io/boards/beagley/ai/02-quick-start.rst, line 14.)
Todo
Add details about all the schematic sections.
(The original entry is located in /builds/melta101/docs.beagleboard.io/boards/beagley/ai/03-design.rst, line 6.)
Todo
Add Final DDR Part Number
(The original entry is located in /builds/melta101/docs.beagleboard.io/boards/beagley/ai/03-design.rst, line 220.)
Todo
Add details about specific EEPROM contents and formatting.
(The original entry is located in /builds/melta101/docs.beagleboard.io/boards/beagley/ai/03-design.rst, line 255.)
Todo
Explain UHS-1 in more detail and add link to TRM for boot modes and resistor swap options for advanced users.
(The original entry is located in /builds/melta101/docs.beagleboard.io/boards/beagley/ai/03-design.rst, line 270.)
Todo
Add link to docs on building expansion accessories.
(The original entry is located in /builds/melta101/docs.beagleboard.io/boards/beagley/ai/03-design.rst, line 289.)
Todo
Describe how to build expansion hardware for BeagleY-AI
(The original entry is located in /builds/melta101/docs.beagleboard.io/boards/beagley/ai/04-expansion.rst, line 6.)
Todo
Add production boot media link in _static/epilog/production.image and reference it here.
(The original entry is located in /builds/melta101/docs.beagleboard.io/boards/beagley/ai/06-support.rst, line 12.)
Todo
Add further testing steps, results, and images.
(The original entry is located in /builds/melta101/docs.beagleboard.io/boards/beagley/ai/demos/beagley-ai-arducam-imx219-v3link-dual-camera-kit.rst, line 6.)
Todo
ADD CSI 0/1 Header Location photo.
(The original entry is located in /builds/melta101/docs.beagleboard.io/boards/beagley/ai/demos/beagley-ai-arducam-imx219-v3link-dual-camera-kit.rst, line 21.)
Todo
Add further testing steps, results, and images.
(The original entry is located in /builds/melta101/docs.beagleboard.io/boards/beagley/ai/demos/beagley-ai-expansion-nvme.rst, line 6.)
Todo
Add further testing steps, results, and images.
(The original entry is located in /builds/melta101/docs.beagleboard.io/boards/beagley/ai/demos/beagley-ai-pca9685-motor-drivers.rst, line 3.)
Todo
Add more information on Waveshare motor & servo driver HAT.
(The original entry is located in /builds/melta101/docs.beagleboard.io/boards/beagley/ai/demos/beagley-ai-pca9685-motor-drivers.rst, line 105.)
Todo
Expand on running 2 DC motor objects
(The original entry is located in /builds/melta101/docs.beagleboard.io/boards/beagley/ai/demos/beagley-ai-pca9685-motor-drivers.rst, line 229.)
Todo
Add information about software image used for this demo.
(The original entry is located in /builds/melta101/docs.beagleboard.io/boards/beagley/ai/demos/beagley-ai-using-gpio.rst, line 6.)
Todo
Add fritzing diagram and chapter on Pin Binding here
(The original entry is located in /builds/melta101/docs.beagleboard.io/boards/beagley/ai/demos/beagley-ai-using-gpio.rst, line 50.)
Todo
Add instructions to use OLED for console and printing text via /dev/fb0 interface.
(The original entry is located in /builds/melta101/docs.beagleboard.io/boards/beagley/ai/demos/beagley-ai-using-i2c-oled-display.rst, line 151.)
Todo
Add further testing steps, results, and images.
(The original entry is located in /builds/melta101/docs.beagleboard.io/boards/beagley/ai/demos/beagley-ai-using-imx219-csi-cameras.rst, line 6.)
Todo
add instructions to setup CSI1
(The original entry is located in /builds/melta101/docs.beagleboard.io/boards/beagley/ai/demos/beagley-ai-using-imx219-csi-cameras.rst, line 109.)
Todo
add instruction to take photos and videos
(The original entry is located in /builds/melta101/docs.beagleboard.io/boards/beagley/ai/demos/beagley-ai-using-imx219-csi-cameras.rst, line 114.)
Todo
Add further testing steps, results, and images..
(The original entry is located in /builds/melta101/docs.beagleboard.io/boards/beagley/ai/demos/beagley-ai-using-pwm.rst, line 6.)
Todo
Add section about driving Servo Motors at 50KHz
(The original entry is located in /builds/melta101/docs.beagleboard.io/boards/beagley/ai/demos/beagley-ai-using-pwm.rst, line 140.)
Todo
Fill out empty section
(The original entry is located in /builds/melta101/docs.beagleboard.io/boards/beagley/ai/demos/beagley-ai-using-pwm.rst, line 145.)
Todo
Fill out empty section
(The original entry is located in /builds/melta101/docs.beagleboard.io/boards/beagley/ai/demos/beagley-ai-using-pwm.rst, line 150.)
Todo
figure out if BONE-SPI0_0 and BONE-SPI0_1 can be loaded at the same time
(The original entry is located in /builds/melta101/docs.beagleboard.io/boards/capes/cape-interface-spec.rst, line 581.)
Todo
We need a udev rule to make sure the ADC shows up at /dev/bone/adc! There’s nothing for sure that IIO devices will show up in the same place.
(The original entry is located in /builds/melta101/docs.beagleboard.io/boards/capes/cape-interface-spec.rst, line 750.)
Todo
I think we can also create symlinks for each channel based on which device is there, such that we can do /dev/bone/adc/Px_y
(The original entry is located in /builds/melta101/docs.beagleboard.io/boards/capes/cape-interface-spec.rst, line 752.)
Todo
I believe a multiplexing IIO driver is the future solution
(The original entry is located in /builds/melta101/docs.beagleboard.io/boards/capes/cape-interface-spec.rst, line 754.)
Todo
remove deep references to git trees
(The original entry is located in /builds/melta101/docs.beagleboard.io/boards/capes/cape-interface-spec.rst, line 849.)
Todo
Additional quadrature encoders can be implemented in PRU firmware.
(The original entry is located in /builds/melta101/docs.beagleboard.io/boards/capes/cape-interface-spec.rst, line 947.)
Todo
This doesn’t include any abstraction yet.
(The original entry is located in /builds/melta101/docs.beagleboard.io/boards/capes/cape-interface-spec.rst, line 1018.)
Todo
Describe I2S and ALSA
(The original entry is located in /builds/melta101/docs.beagleboard.io/boards/capes/cape-interface-spec.rst, line 1218.)
Todo
Document dynamic DT overlays
(The original entry is located in /builds/melta101/docs.beagleboard.io/boards/capes/cape-interface-spec.rst, line 1471.)
Todo
Document dynamic pinmux control
(The original entry is located in /builds/melta101/docs.beagleboard.io/boards/capes/cape-interface-spec.rst, line 1478.)
Todo
Describe how the Device Trees expose symbols for reuse across boards
(The original entry is located in /builds/melta101/docs.beagleboard.io/boards/capes/cape-interface-spec.rst, line 1490.)
Todo
The steps used to verify all of these configurations is to be documented here. It will serve to document what has been tested, how to reproduce the configurations, and how to verify each major triannual release. All faults will be documented in the issue tracker.
(The original entry is located in /builds/melta101/docs.beagleboard.io/boards/capes/cape-interface-spec.rst, line 1526.)
Todo
Get OSHWA certification for all of our capes and update the documentation to reflect that
(The original entry is located in /builds/melta101/docs.beagleboard.io/boards/capes/index.rst, line 9.)
Todo
Update for 2023-06-03
(The original entry is located in /builds/melta101/docs.beagleboard.io/books/beaglebone-cookbook/01basics/basics.rst, line 332.)
Todo
Update for BeagleY-AI
(The original entry is located in /builds/melta101/docs.beagleboard.io/books/beaglebone-cookbook/02sensors/sensors.rst, line 554.)
Todo
fix deg
(The original entry is located in /builds/melta101/docs.beagleboard.io/books/beaglebone-cookbook/02sensors/sensors.rst, line 826.)
Todo
Update for BeagleY-AI
(The original entry is located in /builds/melta101/docs.beagleboard.io/books/beaglebone-cookbook/02sensors/sensors.rst, line 1021.)
Todo
Remove?
(The original entry is located in /builds/melta101/docs.beagleboard.io/books/beaglebone-cookbook/02sensors/sensors.rst, line 1236.)
Todo
is this up to date?
(The original entry is located in /builds/melta101/docs.beagleboard.io/books/beaglebone-cookbook/05tips/tips.rst, line 771.)
Todo
update
(The original entry is located in /builds/melta101/docs.beagleboard.io/books/beaglebone-cookbook/05tips/tips.rst, line 804.)
Todo
Test this
(The original entry is located in /builds/melta101/docs.beagleboard.io/books/beaglebone-cookbook/05tips/tips.rst, line 893.)
Todo
switch to ip address
(The original entry is located in /builds/melta101/docs.beagleboard.io/books/beaglebone-cookbook/05tips/tips.rst, line 979.)
Todo
check this iptables, convert to ufw
(The original entry is located in /builds/melta101/docs.beagleboard.io/books/beaglebone-cookbook/05tips/tips.rst, line 1006.)
Todo
update
(The original entry is located in /builds/melta101/docs.beagleboard.io/books/beaglebone-cookbook/05tips/tips.rst, line 1261.)
Todo
verify this works. fonts are taking too long to load
(The original entry is located in /builds/melta101/docs.beagleboard.io/books/beaglebone-cookbook/06iot/iot.rst, line 502.)
Todo
Is this true: (The plot is wrong, but eLinux won’t let me fix it.)
(The original entry is located in /builds/melta101/docs.beagleboard.io/books/beaglebone-cookbook/06iot/iot.rst, line 594.)
Todo
My twilio account is suspended, using yoder@rose-hulman.edu.
(The original entry is located in /builds/melta101/docs.beagleboard.io/books/beaglebone-cookbook/06iot/iot.rst, line 665.)
Todo
Start Here. Update for python.
(The original entry is located in /builds/melta101/docs.beagleboard.io/books/beaglebone-cookbook/06iot/iot.rst, line 866.)
Todo
Add cape examples of various sizes
(The original entry is located in /builds/melta101/docs.beagleboard.io/books/beaglebone-cookbook/09capes/capes.rst, line 18.)
Todo
Update display cape example
(The original entry is located in /builds/melta101/docs.beagleboard.io/books/beaglebone-cookbook/09capes/capes.rst, line 23.)
Todo
Switch from LEDscape to FPP
(The original entry is located in /builds/melta101/docs.beagleboard.io/books/pru-cookbook/01case/case.rst, line 36.)
Todo
verify these commands
(The original entry is located in /builds/melta101/docs.beagleboard.io/books/pru-cookbook/01case/case.rst, line 111.)
Todo
Recheck
(The original entry is located in /builds/melta101/docs.beagleboard.io/books/pru-cookbook/01case/case.rst, line 341.)
Todo
This is currently broken with the latest version of Falcon Christmas (no F8-B-20.json file)
(The original entry is located in /builds/melta101/docs.beagleboard.io/books/pru-cookbook/01case/case.rst, line 431.)
Todo
Show how to drive ws2812’s with FPP.
(The original entry is located in /builds/melta101/docs.beagleboard.io/books/pru-cookbook/01case/case.rst, line 445.)
Todo
document the code
(The original entry is located in /builds/melta101/docs.beagleboard.io/books/pru-cookbook/01case/case.rst, line 595.)
Todo
update the figures.
(The original entry is located in /builds/melta101/docs.beagleboard.io/books/pru-cookbook/01case/case.rst, line 759.)
Todo
update this
(The original entry is located in /builds/melta101/docs.beagleboard.io/books/pru-cookbook/01case/case.rst, line 863.)
Todo
Update links
(The original entry is located in /builds/melta101/docs.beagleboard.io/books/pru-cookbook/02start/start.rst, line 178.)
Todo
The ‘s and _’s in the code are messing with the formatting.
(The original entry is located in /builds/melta101/docs.beagleboard.io/books/pru-cookbook/02start/start.rst, line 333.)
Todo
The version of code used needs to be noted in the documentation.
(The original entry is located in /builds/melta101/docs.beagleboard.io/books/pru-cookbook/03details/details.rst, line 42.)
Todo
Why is this documented in multiple places?
(The original entry is located in /builds/melta101/docs.beagleboard.io/books/pru-cookbook/03details/details.rst, line 44.)
Todo
does this need updating?
(The original entry is located in /builds/melta101/docs.beagleboard.io/books/pru-cookbook/03details/details.rst, line 346.)
Todo
Isn’t working on Pocket at this time.
(The original entry is located in /builds/melta101/docs.beagleboard.io/books/pru-cookbook/04debug/debug.rst, line 113.)
Todo
Check these on the Black and Pocket without grove
(The original entry is located in /builds/melta101/docs.beagleboard.io/books/pru-cookbook/04debug/debug.rst, line 283.)
Todo
Add code for Blue.
(The original entry is located in /builds/melta101/docs.beagleboard.io/books/pru-cookbook/04debug/debug.rst, line 392.)
Todo
Include a section on accessing DDR.
(The original entry is located in /builds/melta101/docs.beagleboard.io/books/pru-cookbook/05blocks/blocks.rst, line 31.)
Todo
fill in Blue
(The original entry is located in /builds/melta101/docs.beagleboard.io/books/pru-cookbook/05blocks/blocks.rst, line 483.)
Todo
get this working on the 5.10 kernel
(The original entry is located in /builds/melta101/docs.beagleboard.io/books/pru-cookbook/05blocks/blocks.rst, line 1584.)
Todo
Test this
(The original entry is located in /builds/melta101/docs.beagleboard.io/books/pru-cookbook/05blocks/blocks.rst, line 1723.)
(The original entry is located in /builds/melta101/docs.beagleboard.io/books/pru-cookbook/05blocks/blocks.rst, line 1816.)
Todo
Place-holder for Arm tutorial
(The original entry is located in /builds/melta101/docs.beagleboard.io/intro/beagle101/arm.rst, line 6.)
Todo
Write assembly guide
(The original entry is located in /builds/melta101/docs.beagleboard.io/intro/beagle101/assembly.rst, line 9.)
Todo
Place-holder for electronics wiring tutorial
(The original entry is located in /builds/melta101/docs.beagleboard.io/intro/beagle101/basic-wiring.rst, line 6.)
Todo
Place-holder for Buildroot tutorial
(The original entry is located in /builds/melta101/docs.beagleboard.io/intro/beagle101/buildroot.rst, line 6.)
Todo
Place-holder for tutorial on the C programming language
(The original entry is located in /builds/melta101/docs.beagleboard.io/intro/beagle101/c.rst, line 6.)
Todo
Place-holder for Debian tutorial
(The original entry is located in /builds/melta101/docs.beagleboard.io/intro/beagle101/debian.rst, line 6.)
Todo
Place-holder for Device Tree tutorial
(The original entry is located in /builds/melta101/docs.beagleboard.io/intro/beagle101/device-tree.rst, line 6.)
Todo
Place-holder for embedded serial interfaces tutorial
(The original entry is located in /builds/melta101/docs.beagleboard.io/intro/beagle101/embedded-serial.rst, line 6.)
Todo
Place-holder for FPGA tutorial
(The original entry is located in /builds/melta101/docs.beagleboard.io/intro/beagle101/fpga.rst, line 6.)
Todo
Make sure we have everything critical from https://beagleboard.github.io/bone101/Support/bone101/
(The original entry is located in /builds/melta101/docs.beagleboard.io/intro/beagle101/index.rst, line 133.)
Todo
Place-holder for Motors tutorial
(The original entry is located in /builds/melta101/docs.beagleboard.io/intro/beagle101/motors.rst, line 6.)
Todo
Create a simple drawing of BeaglePlay connecting to an external add-on with an interesting device on it.
(The original entry is located in /builds/melta101/docs.beagleboard.io/intro/beagle101/qwiic-stemma-grove-addons.rst, line 12.)
Todo
Place-holder for verification tutorial
(The original entry is located in /builds/melta101/docs.beagleboard.io/intro/beagle101/verification.rst, line 6.)
Todo
Place-holder for tutorial on the Verilog programming language
(The original entry is located in /builds/melta101/docs.beagleboard.io/intro/beagle101/verilog.rst, line 6.)
Todo
Place-holder for Wireless Communications tutorial
(The original entry is located in /builds/melta101/docs.beagleboard.io/intro/beagle101/wireless-communications.rst, line 6.)
Todo
We need to describe how to use the “Web IDE” to work with OpenBeagle respositories.
(The original entry is located in /builds/melta101/docs.beagleboard.io/intro/contribution/git-usage.rst, line 189.)
Todo
Why “device” drivers?
(The original entry is located in /builds/melta101/docs.beagleboard.io/intro/contribution/linux-upstream.rst, line 148.)
Todo
Why do we need drivers?
(The original entry is located in /builds/melta101/docs.beagleboard.io/intro/contribution/linux-upstream.rst, line 152.)
Todo
What do drivers look like?
(The original entry is located in /builds/melta101/docs.beagleboard.io/intro/contribution/linux-upstream.rst, line 156.)
Todo
How can we add a step in here to show the network is connected without needing gbridge to be fully functional?
(The original entry is located in /builds/melta101/docs.beagleboard.io/projects/beagleconnect/index.rst, line 230.)
Todo
update the below for the built-in sensors
(The original entry is located in /builds/melta101/docs.beagleboard.io/projects/beagleconnect/index.rst, line 351.)
Todo
can we also handle the case where these sensors are included and recommend them? Same firmware?
(The original entry is located in /builds/melta101/docs.beagleboard.io/projects/beagleconnect/index.rst, line 353.)
Todo
the current demo is for the built-in sensors, not the Click boards mentioned below
(The original entry is located in /builds/melta101/docs.beagleboard.io/projects/beagleconnect/index.rst, line 355.)
Todo
this log needs to be updated
(The original entry is located in /builds/melta101/docs.beagleboard.io/projects/beagleconnect/index.rst, line 361.)
Todo
bring in the GPIO toggle and I2C explorations for greater understanding
(The original entry is located in /builds/melta101/docs.beagleboard.io/projects/beagleconnect/index.rst, line 380.)
Todo
revisit everything below here
(The original entry is located in /builds/melta101/docs.beagleboard.io/projects/beagleconnect/index.rst, line 625.)
Todo
The patches for gb-netlink will eventually be applied here until pushed into mainline.
(The original entry is located in /builds/melta101/docs.beagleboard.io/projects/beagleconnect/index.rst, line 746.)